12.9.13 Rosette Tatsoi

12.9.13 Rosette Tatsoi

Tatsoi goes by several names, such as spoon mustard or spinach mustard. It’s only during the colder part of the season and you see the plant in its entirety that the name rosette bok choy makes sense. It’s rumored that tatsoi can survive under cover of snow, though we harvested these last ones, along with the remaining salad greens, chard and kale, rather than risk losing them all to the deepening cold. 

Harvesting: Celeriac, leeks; last of  the tatsoi, chard, kale, and salad greens.

Preserving: Canned chicken in broth, chicken stock; frozen Long Pie pumpkin.

Posted in garden | Tagged , | 6 Comments

Sickbed Staycation

Staycation

A friend calls it the gift of couch time. With a stash of immunity-boosting herbal tea on hand and a fully loaded Kindle, I’m admitting defeat and letting whatever this bug is take its course. We hope to be back soon, dear friends.

Posted in interlude | 8 Comments

11.18.13 Planting Garlic

11.18.13 Planting Garlic

Planting garlic is one of the most hopeful acts in the garden, a commitment to the next season. It’s the last to go in the ground and, when spring returns, the first to come up.

11.18.13 Planting Garlic

We patiently peel back the cloves, inspecting them for mite damage, and select only the perfect, unblemished ones for planting. This isn’t an entirely necessary step, though our plot is too small to let it fall entirely to chance.

11.18.13 Planting Garlic

The trick is to grow enough garlic to last us until spring, and to replant from. We need 48 cloves of Music, 48 cloves of Phillips, and 12 cloves of Rossa di Sulmona to fill the bed. If all goes well, we’ll plant more of the Rossa di Sulmona next season.

11.18.13 Planting Garlic

Once the garlic cloves are snug in the ground, a layer of compost goes on top, plus 3 to 4 inches of leaf mulch as added protection through winter. The netting is to keep the mulch in place and to dissuade foragers.

11.18.13 Planting Garlic

We lift the row covers whenever temperatures wander over 50°F, which gives us a chance to check on the beds.

11.18.13 Planting Garlic 11.18.13 Planting Garlic

Above: Salad greens, arugula, chard and kale on the left; leeks and celeriac to the right.

11.18.13 Planting Garlic

Kale becomes precious this time of year, when we most appreciate their sturdy leaves, sweetened up from the cold.

11.18.13 Planting Garlic

The chicories rebounded after being browsed by deer, allowing us to harvest it far into fall. We took one last crop before they succumbed to frost damage and, in a take-off on the Pugliese dish Fave e Cicoria, braised the lot to serve with Christmas Limas.

11.18.13 Planting Garlic

These are the last of the carrots, called Napoli, which have been a dependable variety for us. Growing carrots this late into the season makes them extra crispy and sweet.

11.18.13 Planting Garlic

We pulled up some leeks to check on their progress — the King Sieg is a cross from the Siegfried, and both are meant to overwinter.

11.18.13 Planting Garlic

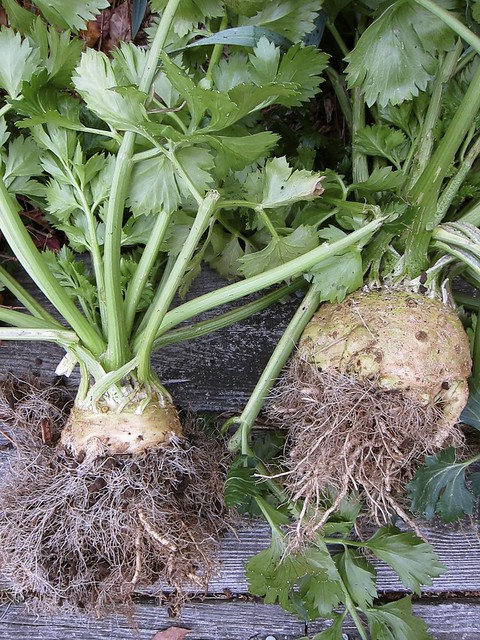
These bearded celeriac are a variety called Brilliant. The more conventionally sized one on the left is about that of a softball, and get pithy when too large. We like their earthy, parsley-like flavor, and served these mashed with buttery potatoes.

11.18.13 Planting Garlic

This week’s harvest all cleaned up and ready for their beauty shot.

Harvesting: Last of carrots, 3 leeks, 2 celeriac, salad greens, and last of chicory.

In ground: Tatsoi, chard, kale, salad greens, leeks, and celeriac.

In storage: Beets, carrots, potatoes, apples, winter squash, winter radishes, turnips, rutabaga, onions, garlic, winter tomatoes, and ground cherries.

Posted in garden | Tagged , , , , , , , , , | 10 Comments

Pear Tart

Pear Tart

If you frequent the Portsmouth Farmers’ Market, you’re probably familiar with White Gate Farm. During the season, they’re there every Saturday in their usual corner spot, and it’s always worth stopping by to see what they’ve brought to market. We were excited when Wolf River Apples reappeared again, an outsized variety that produces only every other year, but it’s their pears that we long for and patiently await. While loading up on palm-sized Seckels, we couldn’t resist adding a bagful of russet-skinned Boscs. These versatile pears are crisp and sweet, good for eating out of hand, and also known for their outstanding ability to hold their shape when baked or poached.

To take advantage of these voluptuous Boscs, we featured them in this surprisingly simple Pear Tart — no pre-baking, just a refrigerated crust that can be made ahead of time, and a thin filling of fragrant frangipane made from almond paste, a heavenly complement to the pears. As usual, we substituted some whole wheat flour for the crust, and make sure you’re using almond paste rather than marzipan, which tastes more of sugar than of almonds. If so inclined, it’s possible to make your own almond paste. The tart is finished off with a classic glaze of apricot jam, which adds some gloss and helps to set and preserve the pears, that is, if the tart lasts that long.

Pear Tart

Crust:
1¼ cups all-purpose flour (or 1 cup all-purpose + 1/4 cup whole wheat flour)
¼ teaspoon salt
1 teaspoon sugar
8 tablespoons (1 stick) unsalted butter, cold
3 to 4 tablespoons ice water

Filling:
⅓ cup almond paste (not marzipan)
2 teaspoons sugar
2 tablespoons unsalted butter
1 tablespoon all-purpose flour
1 large egg
Pinch of sea salt
4 to 5 large Bosc pears
1 teaspoon lemon juice

Glaze:
¼ cup apricot jam
Piece of lemon peel
2 tablespoons water

Prepare the crust: Combine flour, salt and sugar in a bowl. Cut butter into flour mixture. Slowly add ice water a tablespoon at a time, until the mixture barely holds together. Gather into a ball and press into a disc, then place in an air-tight container, and refrigerate for at least 1 hour. Roll the crust into a 13-inch circle, and press it into a 10-inch tart pan with a removable bottom. Trim off the excess dough, and chill in the refrigerator at least 30 minutes.
Prepare the filling: Beat together the almond paste and sugar to break it apart. Beat in the butter; mix in the egg, flour and salt, and beat until light and fluffy.
Prepare the pears: Peel and core the pears, then slice them thinly, and ¼ inch thick. Place the slices in a bowl and mix with lemon juice to help preserve their color.
– Heat the oven to 375°F. Spread the filling over the bottom of the tart shell. Next, arrange the pear slices over the filling. Bake for 30 to 35 minutes, or until the pears take on color and the edges of the tart are golden brown. Cool tart on a wire rack. Remove tart from pan.
Prepare glaze: Place the apricot jam, lemon peel and water in a small sauce pan. Warm over medium heat until simmering, constantly stirring, 5 to 8 minutes. Once it has reduced and thickened, remove from heat. Once the tart is cooled, brush the apricot glaze over the pears.

Adapted from Simply Recipes.

Local ingredients: Bosc pears from White Gate Farm; whole wheat pastry flour from Brookford Farm; cultured butter from Casco Bay Butter Co.; and egg from Meadow’s Mirth.

Posted in cooking | Tagged , , | 4 Comments

Putting Up: Red Pepper Ristras

Putting Up: Red Pepper Ristras

We often keep strands of dried peppers, called ristras, hanging in the kitchen, however, it wasn’t until we were faced with a bushel of them that we had the chance to make our own. Beyond the cultural mash-up of making Southwestern ristras from Japanese Shishito peppers grown in Maine, this seemed a convenient way of drying and storing them at the same time.

Putting Up: Red Pepper Ristras

Not all of the peppers we picked were fully red. Some recommend placing them in a paper bag with a piece of ethylene-producing fruit, such as an apple or green tomato, to further the process. We found just leaving the peppers out at room temperature was enough to give the peppers a chance to redden up on their own.

Putting Up: Red Pepper Ristras

The strand shown at top was our first attempt at following a traditional way of stringing them together. The peppers are tied together in bunches of three, with some space left between the groupings. For a fuller appearance, the ristra may be doubled up on itself to fill in the gaps. The peppers should be left out for a couple of days to allow their stems to lose some moisture but remain flexible enough for stringing together; the pre-drying helps to keep the peppers more secure once they’re tied together. As we made our way through the bushel, we altered this technique and found it easier to handle the peppers by slip-knotting the first stem of each grouping of three.

Putting Up: Red Pepper Ristras

Had we known ahead of time that we were going to be making ristras, we would have made sure to leave the pepper stems as long as possible. At the end, we gathered the short-stemmed ones, threaded a needle, and sewed them together into a strand, Colonial style. As it turns out, this was a quicker method than tying them, though it remains to be seen if this tighter-spaced bunch dries as well as than the rest.

Save for the last one, the strands are made up of 5 to 7 groupings of 3 peppers each, for a total of 15 to 21 peppers per ristra. It takes 3 to 8 weeks for the peppers to dry, and we liked the idea of hanging them over the wood stove to quicken the process, or a fireplace to impart some smokiness. Unfortunately, to avoid a repeat of the string incident, neither place would have put them far enough out of the reach of our cats.

Resources
Using Chile: Making Ristras, Making Chile Sauce 
• How to make a chile ristra
DIY: Dried Vegetables, Colonial Style
Reviving a Lost Art
Kiln Smoked

Posted in garden, preserving | Tagged , , | 7 Comments

11.11.13 Under Cover

11.11.13

The garden beds are now readied for winter, a sign of quieter days ahead. To the rear, one of the hoop-covered beds holds hardy carrots, celeriac, and leeks. The other one contains kale, chard and salad greens snug under an extra layer of row cover beneath the hoops. In the front, a floating row cover provides some extra protection for frost-tolerant tatsoi and chicories. As for the middle bed, the cover is to keep it from freezing to allow us to plant garlic before the month’s end.

Harvesting: Chicories (puntarelle), tatsoi, kale, chard, salad greens, and fennel.

Preserving: Red pepper ristras for drying.

Posted in garden | Tagged , , , , , , , , , , | 15 Comments

Putting Up: Update on Ball’s BPA-Free Lids

Putting Up: Update on Ball's BPA-Free Lids89

One of the ways of identifying Ball’s BPA-free lids from older versions is by the “Made in USA” printed on the lid. As a reader recently asked, what about their more decorative lids? Ball’s Elite and quilted jelly jars come with lids printed with a design, and Jarden Home Brands, the parent company, suggests looking for the “dot pattern interspersed between the decorative scrollwork atop the lids” to identify them as BPA-free.

Putting Up: Update on Ball's BPA-Free Lids

In a comparison between the BPA-free lids and an older one (above), there’s also a distinct difference in the color of coating on the underside of the lid — the BPA-free lid is a tan shade, while the older one is white.

Previous posts on BPA in canning lids:
Mastering Food Preservation: On BPA in Canning Lids
Mastering Food Preservation: Ball’s BPA-Free Canning Lids
Mastering Food Preservation: More on Identifying Ball’s BPA-Free Lids

Posted in cooking, preserving | Tagged | 11 Comments